Articles by "How-to"

Showing posts with label How-to. Show all posts

18 ,

Give your Gmail Signature a new look by adding social media icons that link to your social profiles!

A Cool way of linking to your Facebook, Twitter or other social media profiles.

How to Add Social Media Icons to Your Gmail Signature

Follow this complete DIY Guide to add social media icon-links to your Gmail Signature!


Step 1: Go to Settings in your Gmail :


Step 2: Under General Tab scroll down and find Signatures, Then type the basic text you want to appear in your Gmail Signature.


Step 3: Now place the cursor where you want to insert your social icons and click on "Insert Image" (As shown in the Screenshot below)


Step 4: You can upload the icons, if you have already downloaded them or 


You can Paste the icon URL (Like in the screenshot below I have pasted the URL for Facebook Icone (size 30x30).


Want to download the icons ? Don't worry, I have provided some of the Social Media Icons at the end of this post.

Step 5: Add one by one the icons you want to link to. Gmail will allow you to upload one image at a time. Here I have added Facebook, Twitter and LinkedIn Icon.


Step 6: Now, To link these icons to your social profile you need to select the icon using mouse (as you normally select a piece of text). Then click on "Link" icon over the text area (as shown in image below i have selected Facebook icon)


Step 7: Clicking on "Link" will leave you with this:


Now click on "Change" and add your Facebook profile link (refer the screenshot below)


TIP: Remember to test your link by clicking on "Test this link" to make sure you have inserted the correct link. It will open your link in a pop-up window.


Now do the same with Twitter and LinkedIn Icons:


Step 8: Now save the changes you made by scrolling down and clicking on "Save Changes".


and...... Done! 


Have a look how  your signature will appear with all your social profile links. YAY! 


Your mail recipient can go to your social profile by clicking on the icons in your Gmail Signature.


and...as i promised here are some Popular Social Media Icons:


FacebookGoogle+InstagramLinkedInPinterestSkypeSnapChatTwitter


You can Right-Click and Save these icons to upload in your signatures or you can just Right-Click and "Copy Image Address" and then paste it as directed in Step 4 above.

How you liked it? Hit us with a comment in the comments section below:

:: Don't forget to Share this with your Friends if you liked the information provided above! :: 

, ,

What is a Bootable Pendrive (USB Flash Drive): 

A Bootable Pendrive is a USB Flash Drive that is able to boot into windows. Booting from an external media (USB Flash Drive) allows you to Install windows instead of using Windows installation CD also you can diagnose and repair Windows that is having trouble while booting from hard drive.


Here's How u can make Your Pendrive Bootable using CMD (Command Prompt):


Step 1: Applying DISKPART Command on your Pendrive:

-Insert Pendrive.

-Open Command Prompt with Admin Rights (Type CMD in Windows Search box, It will show 'Command Prompt' in search Results, Right Click on 'Command Prompt' and Select 'Run as Administrator'. Refer the Screenshot below:


-Now Run the following commands in exact order as shown in Screenshot below:


The Commands go like this (Press Enter after each Command That's how you RUN a Command in Command Prompt :-) )

1. Diskpart

2. List Disk (It lists the Active Disks on PC with a Number. Disk 0 is for Hard Disk and Disk 1 is for your Pendrive i.e. Removable Disk)


3. Select Disk 1


4. Clean


5. Create Partition Primary


6. Select Partition 1


7. Active


8. Format fs=ntfs Quick (here adding 'Quick' performs a quick format, you can also use this Command without 'Quick' but it will take some time to Format the Removable Disk.)


9. Exit (Yay! you are done with Step 1)


Step 2. Installing Boot sector

To install boot sector in your Pendrive you need to open, in Command Prompt, the location where your Windows Setup files is saved . Say, your Windows Setup files is saved in D: (D Drive) and Pendrive is E: (USB FLASH Drive). You need to install Boot Sector file (One of the Windows Setup files) from D Drive to E Drive (i.e. Your Pendrive)

Refer the below screenshot and run the following commands in Command Prompt:


1. D: 

2. cd Windows Setup Files (It navigates to the Folder in D: named Windows Setup Files)


3. cd boot (It navigates to the Folder in "Windows Setup Files' named Boot)


4. bootsect /nt60 E: (It Installs the Boot Sector file in E: that is your Pendrive)


After the Following message "Bootcode was successfully updated on all targeted volumes" Type Exit  and Press Enter-Key to exit the Command Promt.


Now the FINAL Step is to Copy all the setup files into your Pendrive. 

Do this by Selecting all the setup files in the Folder "Windows Setup Files", Right-Click Then choose 'Send to' and select your Pendrive.

When the files get copied. Your Bootable Pendrive is ready !!!


Have Queations?? Let us know in the Comments Section below. We are here to Help! :)


:: Don't forget to Share this with your Friends if you liked the information provided above! ::

2 , ,

What is a Bootable Pendrive (USB Flash Drive): 

A Bootable Pendrive is a USB Flash Drive that is able to boot into windows. Booting from an external media (USB Flash Drive) allows you to Install windows instead of using Windows installation CD also you can diagnose and repair Windows that is having trouble while booting from hard drive.


Here's How you can make Your Pendrive Bootable using Rufus:

Things you will need:

1. A Pendrive (Obviously)
2. Rufus (A Third Party Software)
3. A Windows ISO File (To be loaded to your Pendrive)

If you don't have Rufus installed on your PC, You can Download and Install it from >> HERE <<

Follow these Steps after Installation.

Step 1. Open Rufus, It will automatically detect your Pendrive OR You can choose one if you have 2 or more Pendrives inserted in your PC (Screenshot Below)


Step 2. Now choose Partition Scheme and Target System Type. Here MBR Partition Scheme for BIOS or UEFI Computer is recommended as shown in Screenshot below:


Step 3.  Refer the image below:
             Under pointType your Label name OR Rufus takes the name of ISO file by default.
             Under point 2 Click on that icon and Browse for your ISO file.
             Undet point 3 Click start to begin the process.


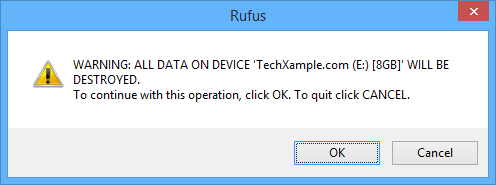
When you Press Start Rufus gives you the following warning message:


Click OK  to proceed further.

Step 4. Now Let Rufus do its work. Your Bootable Pendrive is ready when Rufus shows this:


Quite Simple! Isn't it ?  Let us know in the comments section below...


:: Don't forget to Share this with your Friends if you liked the information provided above! ::

, , ,
µTorrent is widely used freeware to download files with huge amount of data also Its very easy to Download through this software.You don't have to worry about Link Breakdown as it Resumes the Downloads from where it was Interrupted but unlike any Download manager software it works upon peer-to-peer file sharing method to download files.

But if you are annoyed with the ads this software shows like in the screen shot below:


You can remove those ads by following this trick:

Step 1: Go to Options>Preferences


Step 2: Select Advanced as shown in screenshot below:


Step 3: Now in Filter Box, Type "Offer"


Step 4: Scroll till the end and find these

                 offers.left_rail_offer_enabled        True

                 offers.sponsored_torrent_offer      True


Step 5: Change both the values from "true" to "false" (Screenshot below)


Step 6: Click OK and Whoa! Congrats you did it yourself !


:: Don't forget to Share this with your Friends if you liked the information provided above! ::

Author Name

Contact Form

Name

Email *

Message *

Powered by Blogger.